B16MCC
Dreambox Gimp & Coder
- Joined
- Nov 16, 2005
- Messages
- 1,562
- Reaction score
- 8
- Points
- 0
- Age
- 51
- My Satellite Setup
-
2 Dreamboxes..........
---------------------------------------------
--- DM 8000 HD PVR & DM 800 HD ---
Motek SG2100 & Triax 80cm Dual LNB
------ Fixed Dish 28e Quad LNB -------
---- Sly HD Full & 24" Apple iMAC ----
- My Location
- /var/tuxbox/config
Ok guys here's a tutorial on the basics of Dreambox Edit, currently in version 3.0.0. I have attached the installer for your convinience.
Once installed , start the program and you'll be met with the main screen.
Options.
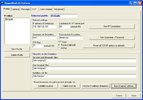
From the list of icons across the top of the screen click 'Options'. This is very important and will need some setup.
The most important part of this is the first tab called 'Profiles'. For the scope of this tutorial we will not be looking at any other tabs in Options.
So , the things you need to pay attention to in options are :-
Satellite Receiver - Type 2 = DM500 / 600 / 7000 / 7020
C a b l e Receiver - Type 2 = As above ( There will be no more mention of cable receivers in this tutorial)
Version 3 Settings (Enigma2) - Type 3= DM7025
New Enigma2 Settings - Type 4 = DM800 / DM8000
Type 3 & 4 have the same 'File paths'.
As you click these different buttons you'll see the 'File paths' changing accordingly but you will not see the 'Type' change until you exit the options screen. The type is shown in the status bar at the bottom of the main window. Its important you get these settings right to match the box your using or you will have trouble transferring your bouquets to and from the box. See the attached images.
FTP
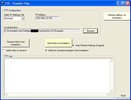
Once you're finished with Options, you can move onto the FTP button, again from the list at the top of the main window.
In here you need to select a folder on your PC where you're going to store your bouquet files for editing. I usually create a folder on my desktop and then select it from here. Once you've made you're folder, click Browse and select it.
Now you have selected the folder we can grab the files from the Dreambox and transfer them to it.
Click 'Receive files from Dreambox'.
Assuming you've scanned the satellites you're interested in, DBedit will now FTP all the required files to your selected folder and open them for editing. Once this completes close the FTP window and move back to the main window.
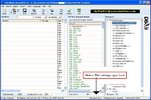
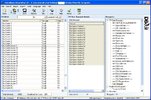
Now you'll see the main window is populated with the information from your Dreambox.
Main Window
The main window is split into 3 panes.
Left pane = Services
Middle pane = Bouquet contents.
Right pane = Bouquet list.
Within the 3 panes of the main window you'll find the Right Click is very powerful and contains the functions you'll use most.
Creating New Bouquets
In the right hand pane right click on 'TV User Bouquets' and click 'Insert New Bouquet.
Enter the name of the bouquet and press enter. Now you have your first bouquet, all be it empty.
The middle pane of the main window now shows the contents of your new bouquet. (Or Any Selected Bouquet).
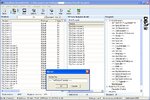
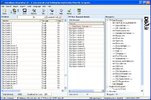
Adding Channels To A Bouquet.
In the left hand pane is your list of scanned services from your Dreambox. You'll notice above the services pane you have 2 drop down boxes. Here you can select from the different satellites you've scanned and select different broadcast types, Data , Radio or TV. If you like you can leave both of these choices to display all types and all satellites.
I'm gonna select TV and Astra2 28.2e
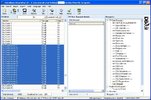
This will now filter my services list to display what I've asked for. I can now select channels from the list and drag them into my new bouquet. If I want to select multiple consecutive channels I can hold down the shift key and press the down arrow to select many channels at once. Or if I want to selet multiple channel but not consecutively I can hold down CTRL and click the channels I want. Once I have them selected they will highlight in blue and I can drag them all together into my new bouquet in the centre pane. You can drag multiple or single selections.
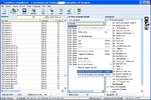
Markers
You can insert 'Markers' into bouquet lists if you like to help describe a channel or a set of channels. In the centre pane simply right click and click 'Insert Marker' Enter the text you want and click ok. You can position the marker in the bouquet by dragging it up and down the list.
You can also rearrange the channel list in a bouquet in the same way by dragging a channel up or down the list.
Save & FTP To Dreambox
Once you have done what you want don't forget the click 'Save' at the top of the main window. Once finished you can click 'FTP' again and this time click 'Send Files To Dreambox' this will send the bouquet you've made to your dreambox. Once complete click 'Reload settings on Dreambox' to have the changes take affect.
INCOMPLETE TO BE CONTINUED
Once installed , start the program and you'll be met with the main screen.
Options.
From the list of icons across the top of the screen click 'Options'. This is very important and will need some setup.
The most important part of this is the first tab called 'Profiles'. For the scope of this tutorial we will not be looking at any other tabs in Options.
So , the things you need to pay attention to in options are :-
- IP Address of Dreambox. - Enter your box IP here.
- Dreambox HTTP Server port - Very rarely changed from 80.
- Username on Dreambox - Nearly always 'root'.
- Password on Dreambox - Standard password is 'dreambox'.
- FTP Port - Nearly always 21.
- File paths on the Dreambox.
Satellite Receiver - Type 2 = DM500 / 600 / 7000 / 7020
C a b l e Receiver - Type 2 = As above ( There will be no more mention of cable receivers in this tutorial)
Version 3 Settings (Enigma2) - Type 3= DM7025
New Enigma2 Settings - Type 4 = DM800 / DM8000
Type 3 & 4 have the same 'File paths'.
As you click these different buttons you'll see the 'File paths' changing accordingly but you will not see the 'Type' change until you exit the options screen. The type is shown in the status bar at the bottom of the main window. Its important you get these settings right to match the box your using or you will have trouble transferring your bouquets to and from the box. See the attached images.
FTP
Once you're finished with Options, you can move onto the FTP button, again from the list at the top of the main window.
In here you need to select a folder on your PC where you're going to store your bouquet files for editing. I usually create a folder on my desktop and then select it from here. Once you've made you're folder, click Browse and select it.
Now you have selected the folder we can grab the files from the Dreambox and transfer them to it.
Click 'Receive files from Dreambox'.
Assuming you've scanned the satellites you're interested in, DBedit will now FTP all the required files to your selected folder and open them for editing. Once this completes close the FTP window and move back to the main window.
Now you'll see the main window is populated with the information from your Dreambox.
Main Window
The main window is split into 3 panes.
Left pane = Services
Middle pane = Bouquet contents.
Right pane = Bouquet list.
Within the 3 panes of the main window you'll find the Right Click is very powerful and contains the functions you'll use most.
Creating New Bouquets
In the right hand pane right click on 'TV User Bouquets' and click 'Insert New Bouquet.
Enter the name of the bouquet and press enter. Now you have your first bouquet, all be it empty.
The middle pane of the main window now shows the contents of your new bouquet. (Or Any Selected Bouquet).
Adding Channels To A Bouquet.
In the left hand pane is your list of scanned services from your Dreambox. You'll notice above the services pane you have 2 drop down boxes. Here you can select from the different satellites you've scanned and select different broadcast types, Data , Radio or TV. If you like you can leave both of these choices to display all types and all satellites.
I'm gonna select TV and Astra2 28.2e
This will now filter my services list to display what I've asked for. I can now select channels from the list and drag them into my new bouquet. If I want to select multiple consecutive channels I can hold down the shift key and press the down arrow to select many channels at once. Or if I want to selet multiple channel but not consecutively I can hold down CTRL and click the channels I want. Once I have them selected they will highlight in blue and I can drag them all together into my new bouquet in the centre pane. You can drag multiple or single selections.
Markers
You can insert 'Markers' into bouquet lists if you like to help describe a channel or a set of channels. In the centre pane simply right click and click 'Insert Marker' Enter the text you want and click ok. You can position the marker in the bouquet by dragging it up and down the list.
You can also rearrange the channel list in a bouquet in the same way by dragging a channel up or down the list.
Save & FTP To Dreambox
Once you have done what you want don't forget the click 'Save' at the top of the main window. Once finished you can click 'FTP' again and this time click 'Send Files To Dreambox' this will send the bouquet you've made to your dreambox. Once complete click 'Reload settings on Dreambox' to have the changes take affect.
INCOMPLETE TO BE CONTINUED
Attachments
-
 DBEdit Main.JPG117.2 KB · Views: 2,263
 -
 DBEdit Options.JPG67.6 KB · Views: 2,035
 -
 DBEdit FTP.JPG38.4 KB · Views: 1,776
 -
 DBEdit Marker 1.JPG138.8 KB · Views: 1,705
 -
 DBEdit Bouquet 2.JPG141 KB · Views: 1,648
 -
 DBEdit Bouquet 3.JPG147.4 KB · Views: 1,365
 -
 DBEdit Marker 2.JPG142.4 KB · Views: 1,311
 -
 DBEdit Bouquet 1.JPG124.5 KB · Views: 1,301