Channel Master 1.8 Restoration

The other thing that worries me a bit is that it only has one ring of fixing bolts on the sleeve. Id prefer some top & bottom.
If you make main pole adjustable than one ring on the sleeve is enough.
 
What's really needed... are pictures!
Some of the original fixings were not stainless so I have replaced them all. One of the original galvanised coach bolts, securing the dish face, had been substituted by something a bit smaller. It was quite hard to source 1/2” SS coach bolts so I got a set of 12mm.
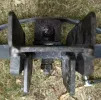
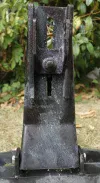
Replacing the 12mm bolt that secured the pole sleeve to the mount with a 1/2” bolt reduced the play. However, the elevation adjustment had 2 problems that caused the polar axis to be skewed. First, the plate welded on the end of the threaded rod was not aligned with its mating part on the polar axis. Second, the threaded rod could not be set perpendicular to the base plate to which it attaches. See pics:

Elev_adj_original_42.webp Elev_adj_original_43.webp

I tried out a mod using a couple of plates and some packing washers. This seems to work ok as the whole thing is much better aligned and the articulation provided by the plate means that the adjustment rod is perpendicular to its mounting plate now. I will need to choose the packing more carefully to align everything a bit better and I may need something a bit stronger than 0.8mm ali for the plates!

Elev_mod_side_46.webp Elevation_adjuistment_mod_trial_48.webp Elevation_adjustment_mod_trial_47.webp mount_Modified_Elevation_trial_49.webp

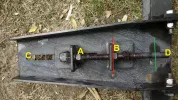
Next, to try to add inclination control. In the pics, nut A is welded to the adjustment bolt and nut B is welded to the fixed angle bracket. I do not really want to totally destroy what’s there. The simplest modification I can think of is to fix a bracket, for one end of an actuator, at point C and to put something like a track rod end at point D on the rod. I will need to drill out nut B to allow the threaded rod to move freely. I will experiment with some PTFE sheet to allow the U-channel (see 2nd pic below) to move more easily.

Decl_top_50.webp Dec_end_51.webp Dec_Underside_52.webp
 
Last edited:
I ordered a 24" HD Superjack from SSS and received something that looks like a Superjack but has "Stronger" branding. Has anyone else seen this branding? It is certainly a heavy lump and says it's "3D" and "Full HD" but will it do 4k/UHD?
Stronger_Jack.webp

I'll be using one of Moonbase's Linaks for inclination as it suits the mods proposed in post 23.
 
All these jacks are crap - sorry, but there's no other way of putting it. A bunch of us here imported some Venture ones from the States - these are miles and miles ahead anything that you can buy in Europe. Pricey but worth it.
 
All these jacks are crap - sorry, but there's no other way of putting it. A bunch of us here imported some Venture ones from the States - these are miles and miles ahead anything that you can buy in Europe. Pricey but worth it.


Are you saying LINAK actuators are crap ?
 
Are you saying LINAK actuators are crap ?
I presumes CJ meant the Super*Jack ones.

The Linak is great for my purposes because is doesn't have a track rod type end near the motor nor does it need a clamp. I will post pics when it is done but I am extending the U channel (at the end marked C in this pic: https://www.satellites.co.uk/forums/attachments/decl_top_50-jpg.96858/), and will bolt the Linak between the uprights of the U, with spacers. That also means that the motor will be uppermost and the cover will be the right way up. The moving part of the actuator will be fixed to the threaded rod, via a 25mm section solid ali block, near point D on the picture.
 
The Linak seemed OK but I've only seen the one used for inclination and I am not sure whether it's even possible to use one for azimuth. For inclination/declination, I am happy even with a crappy Super*Jack - it's a much easier job moving a couple of inches at most rather than the full breadth of the arc.
 
The Linak seemed OK but I've only seen the one used for inclination and I am not sure whether it's even possible to use one for azimuth. For inclination/declination, I am happy even with a crappy Super*Jack - it's a much easier job moving a couple of inches at most rather than the full breadth of the arc.
Agree with CJ here. When going from one end of the arc to the other the Super Jack is not up to the job, loses counts then you start having to re-sync the darn thing, their was play in mine too. The Venture is in a different league altogether, well worth the extra cost.
 
I ordered a 24" HD Superjack from SSS and received something that looks like a Superjack but has "Stronger" branding. Has anyone else seen this branding? It is certainly a heavy lump and says it's "3D" and "Full HD" but will it do 4k/UHD?
View attachment 97665...


s-band,

Did you ask SSS about the "Stronger" branded actuator they sent you instead of the SuperJack model that you ordered? Also, does it indicate a country of manufacture anywhere on the "Stronger" actuator?
 
Apparently a few "Superjacks" were sent out with the wrong stickers. The factory sells them with both brandings (and maybe more??). I was assured that it is a Superjack and it does look like one. I was offered a new sticker but I don't think it will make much difference to the performance:D

There is what looks like a carrier's label on the box for an internal journey within China.

I'm having trouble cutting the weld on the nut at point B in this pic without damaging anything else.
https://www.satellites.co.uk/forums/attachments/decl_top_50-jpg.96858/
The space is too confined for an angle grinder and it's too much work for the Dremel. I've filed some of it but it's not easy. Any ideas?
 
Last edited:
Ok read further up would not drilling the thread out be an option rather than removing nut ?
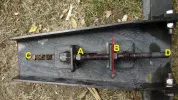
Much easier. However, the bolt is too long to be able to remove since the bolt securing the sliding part is welded to it so I can not remove the slider assembly and bolt. Hence having to remove nut B - unless I've missed something? The nuts must have been welded after the thing was assembled.

View attachment 96858
 
s-band,

Would it be possible to use a corded electric drill with a small grinding wheel/stone in the chuck to grind away the weld? It would provide more power that a dremel. I think that shaped grinding attachements are available that might be worth a try?

Rgds
 
@s-band When you manage to cut weld at point B then your next step will be to weld there another nut. I mean, anyway you will need welding there. I would angle-grind (along the red line) not only weld at point B but also the nut and the long bolt. Afterwards I would weld in new nut and install completely new long bolt (INOX, of course). Decl_top_50.webp
 
@s-band Wait a minute, I do not understand something.....
Long bolt is not stuck in nut at point B! You are saying you can not remove long bolt?! But why? If you untighten nut at point A, then long bolt can not be removed left? What is exact problem, can you explain?
 
@s-band Wait a minute, I do not understand something.....
Long bolt is not stuck in nut at point B! You are saying you can not remove long bolt?! But why? If you untighten nut at point A, then long bolt can not be removed left? What is exact problem, can you explain?
Nut at point A is welded to the bolt. When the bolt is unscrewed the bolt of which the head can be seen welded to the right angle at the left of point A hits the end of the slot at point C before the slide can be removed. There is still about 25mm of thread to the right of nut B. I want the bolt to be able to move freely through point B as the position will be set by an actuator fixed to point D. I suppose I could cut the whole lot apart but I was looking for the minimum mechanical work as it not my strength.
I am more used to working on things under a microscope than this. I have ordered various cutting and grinding tools as suggested by BM & MB as most of my tools are meant for sub-mm work.
 
Nut at point A is welded to the bolt.
I did not see such a solutions before! Usually nut at point A is with nylon inside so it does not move freely. Seems that somebody welded this nut without thinking. In that case you can cut piece of the bolt along the green line.
 

Attachments

  • Decl_top_50.webp
    Decl_top_50.webp
    366.5 KB · Views: 32
Back
Top