Jaeger 1224 restoration/modification

Hi Rimant,

Any updates? I saw an interesting thread here (in Russian) where someone also reenforced their 1224 motor. Quite simple - even something I could do!

Some pictures from there:

e7d99b2763d4.webp d75c127ed6c2.webp 8e81b65f6445.webp 443f3926e55b.webp
9010b69832c0.webp f31da58b8bb8.webp e80de07e080b.webp
 
Hi Alex! No updates at my side.... I've seen this project. It is Skystar from Hungary.
 
Yes, I am still wondering how it will drive a 1.8m CM in its reenforced form. Scared but much more preferable to a PM.
 
Sorry for my bad english focus on my rigid system Gibertini 150 a strong wind broke the motor mount that I made some changes to make the most robust all I am now more confident with regard to strong wind


outer plate 1 cm thick


thickness of the inner sheet 5 mm


piatti sulla scheda principale di montaggio secondo motore


Last night I've realized that I have too many started but never finished projects :oops:, and Jaeger 1224 is one of them. There are several reasons for this situation, like "another priorities", " technical difficulties to solve some issue", "lost of interest" and others. So, to keep Jaeger 1224 project alive, made Panzer plate (@Trust1 drawing). Of course, it is out of 5mm INOX, heavy and strong. Not sure will I install this plate in my motor though, as there is already enough strengths in the construction.
 

Attachments

  • IMG_20160511_200637 (Custom).webp
    IMG_20160511_200637 (Custom).webp
    67.4 KB · Views: 116
  • IMG_20160511_200804 (Custom).webp
    IMG_20160511_200804 (Custom).webp
    74.4 KB · Views: 129
I would put the plate in it. Those motors are renowned for the housing breaking in two. They are nowhere near as tough as they look. I've got the plate in mine.
 
Hi , i'm also looking to buy full set of SS bolts for this motor . Any ideas ?

Or a good way to restore what's left of the old ones .. Vinegar maybe ?
 
Last edited:
I usually buy a set on eBay - as long as they are the same size, they will work.
 
Hi , i'm also looking to buy full set of SS bolts for this motor . Any ideas ?

Or a good way to restore what's left of the old ones .. Vinegar maybe ?
I usually buy a set on eBay - as long as they are the same size, they will work.
Just be somewhat careful about the strength of the bolts you get - that can vary quite a bit, so you need to look at the embossed ratings on the heads of the existing ones and buy some that are at least as strong.
 
Hi , i'm also looking to buy full set of SS bolts for this motor . Any ideas ?

Or a good way to restore what's left of the old ones .. Vinegar maybe ?


Some of the sizes of the original nuts/bolts shipped with the Jaeger 1224 were unusual, they were not standard metric sizes with a common pitch. They used a variety of thread types, metric and UNF come to mind. However, you should have no problem replacing them with stainless steel versions in metric that are very close to the original sizes.

If I recall correctly, the V bolts (20 tpi), the elevation saddle clamp bolt and the elevation pivot axis bolt were unusual thread sizes and pitch with the rest of them being standard metric sizes.
 
Ok , does somebody have or can make a list with what's needed to replace all if not most of the bolts required ?

I'm not very clued up on Bolt measurement .
 
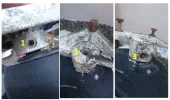
I'm trying to remove the triangular metal plate which attaches to the top of the motor axis on a SMR1224.

I've removed a small screw-head bolt from 1, removed another small bolt with an allen key from 2, and removed a nut from 3. But the triangular plate is still firmly attached, with no obvious way of removing it. I'm not sure how much I can force it, or am I missing something.

In particular, what purpose does the nut on 3 serve - my guess is the threaded part must also be removed somehow?

Any help greatly appreciated!
 

Attachments

  • 1224.webp
    1224.webp
    79.6 KB · Views: 77
At that piece of M6 rod you can screw a M6 long nut to pull out that spigot which is secured with a M5 screw at the opposit end .
Hammer it out from the other side after putting some tension with that spigot puller .

spigot toolstxt.webppulling conical pin.webp

spigot removement.jpg
 
Last edited:
That spigot and subsequent removal of the triangular section is an utter pain. I removed several and all have been as bad as each other. Plenty of penetrating fluid and patience...
 
Back
Top