Just Sharing This Prodelin 0179-189 dish cleaning & conversion to polar mount

beavs2112

Member
Joined
Feb 5, 2012
Messages
168
Reaction score
404
Points
63
Age
57
Location
Canada
My Satellite Setup
see signature
My Location
London, Ontario Canada
Hi folks :). I rescued a Prodelin dish from the garbage a little while ago. https://www.satellites.co.uk/forums/threads/investment-firms-old-dish.161217/#post-929238
In those pics the dish doesn't look so bad. However the feedhorn support arms were severely rusted & the dish has a severe case of mold growing on it. View attachment 82184 View attachment 82185 WP_20150616_001.jpg WP_20150616_004.jpg
So I cleaned the dish & arms with a soapy water/bleach solution using a scouring pad. The results are good now. I am going to paint the arms & dish mount with cold galvaninizing compound aerosol spray paint http://www.rustoleum.com/product-ca...2100-system-galvanizing-compound-spray-paint/

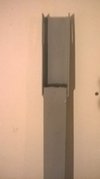
I've semi completed the conversion from a fixed az/el mount to a polar mount. Credit for this design goes to members of satguys.us ------ pendragon,stogie5150. here's pendragons 1.8m dish modifications. SDC10612.JPG SDC10613.JPG SDC10616.JPG SDC10617.JPG SDC10614.JPG So I'm going to copy most of that but put the threaded rods further apart and larger angle iron for more stability. WP_20150808_003[1].jpg Another part of the process is what to use for the feedhorn & lnb. These were transmit & receive setups originally but us FTA hobbyists can only legally receive signals not transmit. So I wanted to use the original feedhorn. more to come :)
 

beavs2112

Member
Joined
Feb 5, 2012
Messages
168
Reaction score
404
Points
63
Age
57
Location
Canada
My Satellite Setup
see signature
My Location
London, Ontario Canada
I used the polar mount from my made in Yugoslavia MZT model STA 300/04 3 meter prime focus dish to convert. It is heavy duty enough to handle the weight of the prodelin back frame,dish & lnb supports. But I didn't like some things on this polar mount so I had to fix them first. The back frame pivot shafts were at an angle which put unnecessary stresses on the pivot bearings & shaft. Before at an angle Photo0558.jpg So I took things apart and welded on some steel to put the frame pivot axis parallel to the back of the frame. WP_20150808_021.jpg WP_20150808_022.jpg The frame pivots on bearings in a steel block. WP_20150808_024.jpg Well the bearings they used had paper covers over the ball bearings and cage and these had rotted away. Water quickly seized the bearings and cage solid so the back frame couldn't pivot from left to right to track the satellite arc. Also water had corroded away a spacer bushing on the upper pivot shaft. Photo0562.jpg So I cut apart the old useless bearing and used the hardened steel inner ring as the replacement spacer bushing. WP_20150808_030.jpg Then I painstakingly found replacement bearings that had a better cage & ball bearing cover. WP_20150808_017.jpg Now things pivot quite effortlessly and should stand up to the elements better. Then I welded on some steel to the MZT frame to fix the prodelin backframe onto the MZT frame. WP_20150808_005.jpg Buying a cobalt drill bit in one inch diameter size was expensive but worth it to drill into the hard steel frame metal. I have one of these http://www.milwaukeetool.com/power-tools/corded/1250-1 for drilling (kinda a poor mans drill press) but it has a lot of torque. now onto the Prodelin lnb & feed modifications.
 

beavs2112

Member
Joined
Feb 5, 2012
Messages
168
Reaction score
404
Points
63
Age
57
Location
Canada
My Satellite Setup
see signature
My Location
London, Ontario Canada
So I want to use all of the signal coming from the 1.8m of the dish and that involves using the correct feedhorn and and feed assembly. Well the dish was a transmit & receive version that the feed assembly didn't easily convert to receive only.
Credit for these most of these pics goes to b1llyboy @ satguys.us forum. Some are mine though. Also in the first pics you can see the rust on the feed support arms. View attachment 82209 1.8 m dish 0192.jpg So the combination transmit/receive unit comes apart.
1.8 METER DISH 0022.jpg View attachment 82214 Since the transmit portion interface doesn't allow a standard WR75 flange LNB to just bolt on I decided to remove it. View attachment 82216 Since I wanted to use this feedhorn and lnb support assembly I had to cut off the transmit portion interface with the angle grinder. The whole combination transmit/receive unit is made from aluminum so its easily drilled & cut. This will allow me to convert the transmit section to another receive section. Another obstacle was the adapter unit between the feedhorn and the transmit section had a 17.5 mm diameter. The diameter of the circular rf waveguide portion of the Prodelin feedhorn is 19mm. The diameter of the circular rf waveguide portion of the Skyware / Channel Master dual polarity ku feed assembly I want to bolt onto the prodelin feed assembly is 19mm also. So I wanted to bore out the diameter of the adapter unit hole to 19mm. This allows for a smooth transition of the rf signal from the feedhorn to the receive lnbs. WP_20150728_001.jpg WP_20150808_013.jpg WP_20150808_016.jpg WP_20150808_014.jpg So now I removed the transmit portion electronics to allow room for the Skyware/CM dual polarity ku feed assembly. Next page ....
 

beavs2112

Member
Joined
Feb 5, 2012
Messages
168
Reaction score
404
Points
63
Age
57
Location
Canada
My Satellite Setup
see signature
My Location
London, Ontario Canada
I wanted to use this feedhorn and lnb support assembly for 3 reasons. It's important to use the feedhorn that is matched precisely to the dish. Also you want the feedhorn in the same precise location where the manufacturer placed it to point at the correct spot on the dish face. And this transmit/ receive unit is skewable so I can use it on a fixed az/el mount or a polar mount. Once the skew is set there is a screw that tightens a plastic ring around the transmit/receive metal box to hold it secure. WP_20150809_003.jpg So now I removed the transmit portion electronics to allow room for the Skyware/CM dual polarity ku feed assembly.WP_20150728_002.jpg I gave the unit & feedhorn back 2 coats of flat white rust paint to match the lnbs. Also I had to remove a portion of the tx/rx unit to allow the two norsat lnbs to fit inside the case. WP_20150809_002.jpg Here's the feedhorn & adapter & skyware omt portion bolted together with 2 Norsat LNBs attached. WP_20150801_006.jpg The lnbs don't fit inside the unit with the cover on WP_20150801_004.jpg so the original rx port has to come off (no need for it since the skyware omt has 2 receive ports. The original rx port is cut off and the hole filled with silicone caulking to prevent water getting in. WP_20150805_005.jpgNow I can turn the unit upside down if necessary to keep rain or sun off the lnbs. WP_20150805_005.jpg WP_20150805_006.jpg WP_20150805_002.jpgWP_20150809_003.jpg Now its ready to be bolted on and tested.WP_20150805_001.jpg
 
Last edited:

Archived-1

Persona non grata
Joined
Apr 14, 2007
Messages
7,570
Reaction score
8,590
Points
113
My Location
uk
Great stuff beavs, the dish has come up a treat :).
 

Costactc

Regular Member
Joined
May 30, 2012
Messages
811
Reaction score
763
Points
93
Age
58
My Satellite Setup
3m channel master mesh-24" vonweise actuator-ps1 x2 lnbf(L)-pansat ap3500 positioner-x2 premium III-vu+solo2.
2.4m fortec solid-24" vonweise actuator-esx 241 lnbf(c)-vbox 7 positioner- dm800.
1.2m fortec-24"sj actuator-invacom snh-031--tm 5402 m3.
My Location
Canada
Excellent job as usual.
 

beavs2112

Member
Joined
Feb 5, 2012
Messages
168
Reaction score
404
Points
63
Age
57
Location
Canada
My Satellite Setup
see signature
My Location
London, Ontario Canada
Great stuff beavs, the dish has come up a treat :).
heres the before & after the cleaning of the dish & feed arm. View attachment 82245 WP_20150809_008[1].jpg WP_20150616_001.jpg WP_20150809_005[1].jpg
the mold really seems to have eaten into the back of the dish so I should spray on some kind of sealer (clear lacquer maybe) to it before I paint it.
 

Archived-1

Persona non grata
Joined
Apr 14, 2007
Messages
7,570
Reaction score
8,590
Points
113
My Location
uk
I guess a primer would not hurt beavs, I use a reddish primer as part of trying to blend my dishes in with the surroundings, but I will be leaving the back on the 1.8 green.
DSCN9496.JPG
 

Archived-1

Persona non grata
Joined
Apr 14, 2007
Messages
7,570
Reaction score
8,590
Points
113
My Location
uk
So I want to use all of the signal coming from the 1.8m of the dish and that involves using the correct feedhorn and and feed assembly. Well the dish was a transmit & receive version that the feed assembly didn't easily convert to receive only.
Credit for these most of these pics goes to b1llyboy @ satguys.us forum. Some are mine though. Also in the first pics you can see the rust on the feed support arms. View attachment 82209 View attachment 82210 So the combination transmit/receive unit comes apart.
View attachment 82211 View attachment 82214 Since the transmit portion interface doesn't allow a standard WR75 flange LNB to just bolt on I decided to remove it. View attachment 82216 Since I wanted to use this feedhorn and lnb support assembly I had to cut off the transmit portion interface with the angle grinder. The whole combination transmit/receive unit is made from aluminum so its easily drilled & cut. This will allow me to convert the transmit section to another receive section. Another obstacle was the adapter unit between the feedhorn and the transmit section had a 17.5 mm diameter. The diameter of the circular rf waveguide portion of the Prodelin feedhorn is 19mm. The diameter of the circular rf waveguide portion of the Skyware / Channel Master dual polarity ku feed assembly I want to bolt onto the prodelin feed assembly is 19mm also. So I wanted to bore out the diameter of the adapter unit hole to 19mm. This allows for a smooth transition of the rf signal from the feedhorn to the receive lnbs. View attachment 82217 View attachment 82218 View attachment 82219 View attachment 82220 So now I removed the transmit portion electronics to allow room for the Skyware/CM dual polarity ku feed assembly. Next page ....

Interesting information :).
 
A

archive10

Guest
[snip]

I am going to paint the arms & dish mount with cold galvaninizing compound aerosol spray paint High Performance - V2100 System Galvanizing Compound Spray Paint

Lovely restoration effort!
Please let us know you progress with this dish - any results yet?

Also, what's your experience with this "cold-galvanizing" paint?
Would it be a substitution for actual galvanizing for a restorartion project?
And how would it compare to, say, Hammerite-treatment?

I have been thinking of removing rust from some of my CM mounts, but I am not sure how to treat the bare metal mounts afterwards...
 

beavs2112

Member
Joined
Feb 5, 2012
Messages
168
Reaction score
404
Points
63
Age
57
Location
Canada
My Satellite Setup
see signature
My Location
London, Ontario Canada
Lovely restoration effort!
Please let us know you progress with this dish - any results yet?

Also, what's your experience with this "cold-galvanizing" paint?
Would it be a substitution for actual galvanizing for a restorartion project?
And how would it compare to, say, Hammerite-treatment?

I have been thinking of removing rust from some of my CM mounts, but I am not sure how to treat the bare metal mounts afterwards...

Hi st1 :) I got started on the restoration and installation then got sidetracked into restoring my Paraclipse chain drive H-H motor. The H-H was supposed to have a 3.0m mesh dish mounted onto it by now but that turned into me redecorating my bedroom & home theater. Darn life getting in the way of my FTA projects :) I need to win the lottery so I can retire from work to solely concentrate on sat stuff! Just kidding :)

So I removed the rust from the feedhorn support arms with a scouring pad and some water. I didn't remove any of the original galvanize or strip it down to the bare metal so I don't know if my results will be comparable to yours if you strip your rusty CM mount down. I painted the arms with the galvanizing paint. It didn't bubble or react with the galvanize underneath so it seems safe to spray it directly over the galvanize. The paint is in an aerosol can and definitely doesn't seem as thick as some rust preventative paints like rustoleum or Hammerite. After the paint dried it is a flat type of paint rather than a glossy finish. it doesn't have that multishaded grey look that galvanized metal that has been properly dipped in a vat of liquid galvanizing paint does.

Also since I got sidetracked the parts were stored in my shed so they haven't been exposed to the elements. So I'm not fully convinced this paint is going to last as long as a properly dipped metal piece. I guess I'll only know in 20-30 years time :) This new paint seems to hold up well against scratches. I don't think it will ever replace a properly dipped galvanized coating however.

On the other hand I have seen this type of aerosol galvanizing paint used back when I was a field service tech for one of our wireless phone carrier companies about 10 years ago. The subcontractors that did the work on the steel transmission towers used it as a touchup paint on the bare steel where the galvanizing topcoat had gotten scratched off or or on small one to two inch sections of new steel. It seemed to last for a good few years in our canadian climate under those conditions at any rate.
So to make a short story longer I would stick with Hammerite.

Here is a photo of the same feed support arm after repainting.
 

Attachments

  • WP_20160118_002.jpg
    WP_20160118_002.jpg
    695.4 KB · Views: 43
Top