Just Say No..?

Ok ..
Motor parts cleaned as best I can ..
Once dry will be reassembled with a small application of lithium grease on moving parts..
Then it's in the lap of the gods...
certainly looks better without that rust paste everywhere..
lol
 

Attachments

  • DSCF0130.webp
    DSCF0130.webp
    133.6 KB · Views: 46
Depends on bad the dish is as you should be able to fill the crack in the dish.

I've a 1m channel master that when in delivery edge of the rim cracked, sand it back and filled with fibreglass resin and seems fine now.

Hope you can get the motor to work as you've got nothing to lose just your time.
 
Well ...
I'm calling that a good days work..
Motor reassembled but still requiring some gasket sealant ..
But hey ..she runs ..and smooth as you like ..
:D
 

Attachments

  • DSCF0131.webp
    DSCF0131.webp
    87.7 KB · Views: 35
Well ...
I'm calling that a good days work..
Motor reassembled but still requiring some gasket sealant ..
But hey ..she runs ..and smooth as you like ..
:D

Hats off to you. Most folk would of binned it. Well done.
 
Hats off to you. Most folk would of binned it. Well done.
Sadly Jase ...that's the world we now live in for most folk..
Not the way I was dragged up ...and in this throw away world my skills are required less and less often...
One of my pet hates/rants ....so best not to get me started.
All I will say is that there are many like me on this board ...which is one of the main reasons I love it here ..
;)
 
Dammit ..
it was all going so well ..
Got to the point where I needed acces to the big gear under the front top cover ...having successfully removed all the bolts holding the Elevation adjustment and plate ..
That took about 2 hours ..
removed one grub screw (philips head) and an allen key headed bolt ...
but when I tried to remove what looked like an M6 nut under a plastic cover on the headstock ..it turned easy ...or so I thought ..
moments later I had the sheared nut in my hand ...
Anyone had this triangular shaped lump off before ?
if so ..advice now needed..
rgds
VS
 

Attachments

  • DSCF0132.webp
    DSCF0132.webp
    111.2 KB · Views: 55
  • DSCF0133.webp
    DSCF0133.webp
    162.1 KB · Views: 54
Dammit ..
it was all going so well ..
Got to the point where I needed acces to the big gear under the front top cover ...having successfully removed all the bolts holding the Elevation adjustment and plate ..
That took about 2 hours ..
removed one grub screw (philips head) and an allen key headed bolt ...
but when I tried to remove what looked like an M6 nut under a plastic cover on the headstock ..it turned easy ...or so I thought ..
moments later I had the sheared nut in my hand ...
Anyone had this triangular shaped lump off before ?
if so ..advice now needed..
rgds
VS

I don't know if you've seen this. It might help?

Mods, please remove the link if I shouldn't of posted it.

www.dxsatcs.com/sites/default/files/consulting/21/jeg1224.pdf
 
Looks like your going to have to drill the bolt/pin out, start with a small drill and work your way up to a size just smaller than the hole sometimes the drill heat will loosen the pin or you can use an " easy out" tool to remove it.
 
.......
All I will say is that there are many like me on this board ...which is one of the main reasons I love it here ..
;)

Great and true words VS.....THE place is here.
 
Just PMd Rima to ask if he'd take a look at my thread..
,,since he is the go to guy on this subject
;)
 
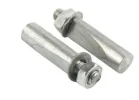
@Vipersan : I did not go too much far away with my Jaeger 1224. But I can confirm we (I myself and with a great help of @Trust1) had hard times removing that piece of metal to unleash triangular part. We where trying to press it out with another bolts.... it did help little bit. I think we finally succeeded only after hammering this bit out with brutal force. I mean, just apply more force to get this thing out in the detection of red arrow. DSCF0133.webp Those things are very similar to bits we had (and still have) on or bicycles. ScreenHunter_260 Apr. 05 01.12.webp ScreenHunter_261 Apr. 05 01.12.webp Perhaps they are even more or less same.
Those 1224 are great, but, unfortunately they are very old and different metals like steel and aluminum (or some kind of aluminum) after staying together after so long time, have chemical processes happening between them making this join very strong.
So, direction of red arrow is right, but it is really hard work to get things moving. Just continue with applying more force in right detection. :rolleyes:
Perhaps, you can drill it out with 6mm drill-bit.
Wait a minute, I have so short memory, perhaps we drilled that bit out.... Maybe Trust1 can confirm it.
Speaking about back motor cover (the plastic part), I think it is real problem. I have no idea how to make it out of nothing. o_O
Certany, your motor has some future, but lots of work should be done on it before it start to turn your antenna. Good luck.

 
One idea for making your own motor cover,
Either use a clear plastic sheet cut to size and join the pieces using chlorofor (this gives a water proof box)
This method is used in hospitals to preserve biological samples in liquid for students teaching.
or,
Use other plastic sheet (not clear) and epoxy cement to join the pieces.
 
@Vipersan : I did not go too much far away with my Jaeger 1224. But I can confirm we (I myself and with a great help of @Trust1) had hard times removing that piece of metal to unleash triangular part. We where trying to press it out with another bolts.... it did help little bit. I think we finally succeeded only after hammering this bit out with brutal force. I mean, just apply more force to get this thing out in the detection of red arrow. View attachment 75864 Those things are very similar to bits we had (and still have) on or bicycles. View attachment 75865 View attachment 75866 Perhaps they are even more or less same.
Those 1224 are great, but, unfortunately they are very old and different metals like steel and aluminum (or some kind of aluminum) after staying together after so long time, have chemical processes happening between them making this join very strong.
So, direction of red arrow is right, but it is really hard work to get things moving. Just continue with applying more force in right detection. :rolleyes:
Perhaps, you can drill it out with 6mm drill-bit.
Wait a minute, I have so short memory, perhaps we drilled that bit out.... Maybe Trust1 can confirm it.
Speaking about back motor cover (the plastic part), I think it is real problem. I have no idea how to make it out of nothing. o_O
Certany, your motor has some future, but lots of work should be done on it before it start to turn your antenna. Good luck.
My thanks for your advice Rima ..
I had a feeling this was a pin ...and not a threaded screw ,,,
and yes I do remember replacing such a thing on bicycle pedals in my youth...
cheers
VS
 
Part 97 is a conical 40 mm long pin , 8.9 mm at the smallest side till 9.6 mm .
The proper way to remove it is to pull it , but thats very diffucult when its a old motor , thats the way we started with Rima's motor .
My picture is a example how to , off course you have to use a steel pipe instead of PVC
I cant remember how we managed it that time , but I have a excuse for that (age) but youngster Rima should know .
According to his posting , we drilled it out .
This motor, certainly has some milage. Everything outside is rusted, corroded and stuck. However, all the gears, electrical motor, under the plastic cover is in good shape.
3 bolts (#1) were stuck completely and gave away their heads, so they were angle-grindered and drilled out. View attachment 64525 View attachment 64526
Metal finger, which fixates upper triangular part to main axe was stuck completely, so it was also drilled out View attachment 64527 View attachment 64528
4 bolts (#4, picture 6) were loosen, so all the gears were removed to tighten them View attachment 64529 View attachment 64530 View attachment 64531
Not happy face (#6, picture 7) :( View attachment 64532
Will do more planning and restoration will continue View attachment 64533 View attachment 64534

My friend Trust! Thanks for great help and spending so much time working on my motor.
conical pin.webp conical pin.webp pulling conical pin.webp
 
Last edited:
Part 97 is a conical 40 mm long pin , 8.9 mm at the smallest side till 9.6 mm .
The proper way to remove it is to pull it , but thats very diffucult when its a old motor , that the way we started with Rima's motor .
My picture is a example how to , off course you have to use a steel pipe instead of PVC
I cant remember how we managed it that time , but I have a excuse for that (age) but youngster Rima should know .
According to his posting , we drilled it out .

View attachment 75878 View attachment 75878 View attachment 75879
Thanks Trust ..
Looks like this may take a while if indeed I ever get it going ..
But it cost me very little ...and is not urgent.
:)
 
Just read more carefully Rima's posting telling to hammer it out in the direction off the red arrow , thats NOT correct .
As you can see , its has to come out at that side .
 
Just read more carefully Rima's posting telling to hammer it out in the direction off the red arrow , thats NOT correct .
As you can see , its has to come out at that side .
So can the pin be driven out from the opposite side perhaps ?
rgds
VS
 
If you drill and tap the broken pin, then using steel tube with a long bolt and washer ( as per previous picture) you can carefully apply force being careful not to break the bolt! if you then soak the pin in a releasing agent like plus gas or wd 40 leave it to free itself over night( hopefully),if it dosen't move try increasing the force and leaving again, the trick is not to break the bolt otherwise you have to start drilling again.
 
Back
Top